Car care includes not only maintaining the appearance of the car, but also protecting the car exterior from the effects of air pollution, rain and mud.
The rustproofing compound under the car should be checked regularly and, if necessary, damaged areas should be repaired.
The paintwork should also be touched up immediately, if damaged, to prevent rust formation.
| 7:2 | Rustproofing |
| 7:4 | Paintwork damage |
| 7:6 | Washing the car |
| 7:8 | Cleaning the upholstery |
What causes rust
The two most common causes of rust to your car are:
The accumulation of road dirt and moisture in hard-to-get-at cavities and other areas under the car.
The removal of paint and protective coatings on the outside of the car and underneath through damage by stones, gravel or minor accidents.
Several factors influence the speed at which corrosion will occur:
The length of time various parts of a car stay wet. Parts of the car filled with road dirt and water remain damp for long periods of time even after other parts have dried.
Particular attention should be paid to the underside of the car and floor sections inside. The floor sections stay wet because moisture collects and remains under the floor matting.
Drain holes located at the bottom of the doors can get clogged with dirt, trapping water inside the door and causing the door to rust at the bottom.
Corrosion will be accelerated in areas of higher relative humidity, especially where temperatures often stay above the freezing point and where the atmosphere is affected by industrial pollution, or where salt is used for de-icing the roads.
Where parts of the car are covered with road dirt containing road salt, corrosion will be accelerated at lower relative humidity than if the surface were clean.
Increased temperature will cause an accelerated rate of corrosion of those parts of the car which are not well ventilated to permit quick drying.
Industrial pollution and the presence of salt will also accelerate the deterioration of paint finishes.
The foregoing identifies the need for every car owner to keep his or her car-particularly the underside-as clean and dry as possible and to repair any minor damage to paintwork and protective coating as soon as possible.
The need is more important in those areas where road salt is used for de-icing, the relative humidity is higher, air pollution is present, and temperatures regularly stay above freezing.
Rustproofing, inspection and touching-up
Your Volvo was carefully and thoroughly rustproofed at the factory.
The underbody and wheelhousings were sprayed with a thick, durable rustproofing compound and the beams, internal cavities and end sections were sprayed with a low viscous, penetrating rustproofing agent.
There are two very effective methods of maintaining this protection:
Keep your car clean.
Clean the underbody, wheelhousings and the edges of the fenders using water at high pressure.
Inspect and touch-up the rustproofing if necessary.
The invisible (internal) rustproofing
As part of your maintenance schedule, it is important that the invisible rustproofing (used for beams, internal cavities and end sections) be retreated first after 36 months and, thereafter, every 24 months. Bear in mind, if good results are to be obtained, that these sections must be treated with a fine spray of Volvo-approved rustproofing compound by your authorized Volvo dealer.
Most of the sheet metal body sections on your Volvo are galvanized, which provides much more protection against corrosion. There are many imitations of Genuine Volvo sheet metal body sections on the market. If any body sections on your car need to be replaced because of an accident or other damage, request only Genuine Volvo sheet metal body sections at the time of the estimate and before your car is repaired.
The visible rustproofing
The visible (external) rustproofing must be inspected by an authorized Volvo dealer at 20,000 mile (32,000 km) intervals. If it is necessary to touch-up the rustproofing, this should be done immediately to prevent moisture penetration. Wash and dry thoroughly before touching up. Use spray-on or brush-on rustproofing compounds.
There are two different types of rustproofing compounds available:
a. thin (transparent) for visible parts.
b. thick, for parts on the underbody and wheel housing which experience most wear.
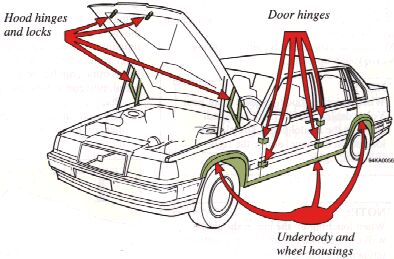
Parts of the car which may need to be touched up and the recommended rustproofing compound are:
visible welded seams and panel seams-(thin)
underbody and wheel housings-(thick)
door hinges-(thin)
hood hinges and locks-(thin).
After completion of all work on the vehicle, remove excess rustproofing compound with a cloth soaked in kerosene.
The sheet metal surfaces of the engine compartment are protected by a transparent wax-based rustproofing compound. The compound withstands normal washings without deterioration.
Mineral based solvents will, however, dissolve the compound, especially so if they contain emulsifiers. In such cases the wax protection should be renewed.
Paint touch-up
Paint damage requires immediate attention to avoid rusting. Make it a habit to check the finish regularly; when washing the car for instance. Touch up if necessary. Paint repairs require special equipment and skill. Contact your Volvo retailer for any extensive damages.
Minor scratches can be repaired by using Volvo touch-up paint.
NOTE:
When ordering touch-up paint from your Volvo retailer, use the paint code indicated on the model plate. The plate is located on the panel above the right-side head lights.
|
NOTE:
When touching up the car, it should be cleaned and dry. The surface temperature should be above 60°F (+15°C).
|

Paint code
Minor stone chips and scratches
Material:
Primer - can
Paint - touch-up bottle
Masking tape
Brush
If the stone chip has not penetrated down to the metal and undamaged layer of paint remains, the touch-up paint can be applied as soon as the spot has been cleaned.
If the stone chip has been penetrated down to the metal, proceed as follows:
1
Place a strip of masking tape over the damaged surface. Pull the tape off so that any loose flakes of paint adhere to it.
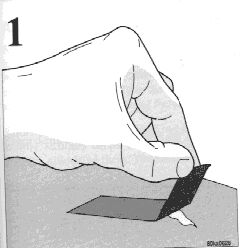
Remove loose flakes of paint with masking tape
2
Thoroughly mix the primer and apply it with a small brush.
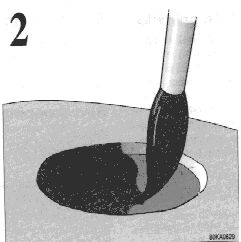
When the primer surface is dry, the paint can be applied using a brush.
Mix the paint thoroughly: apply several thin paint coats and let dry each application.
pg. 7:5
Paint touch-up (cont.)
|
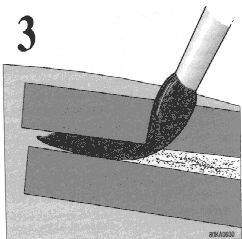
3
If there is a longer scratch, you may want to protect surrounding paint by masking it off.
Touching up damaged paint on fender edges and sills
Material:
Primer - spray
Paint - spray
Masking tape
NOTE:
When touching up the car, it should be well cleaned and dry and have a temperature exceeding 60°F (+15°C).
|
Mask with tape and paper prior to painting larger surfaces. Remove the masking immediately after application of the last paint coat, before the paint starts to dry.
Touching up is as follows:
Remove paint flakes with masking tape.
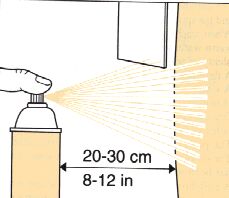
Shake the spray can for at least 1 minute. Spray on the primer. Move the can slowly and evenly back and forth over the spot and about 8-12 in. ( 20 - 30 cm) from the surface. Protect the surrounding surfaces with suitable paper.
WARNING!
Spray painting should be done in a well ventilated and dust-free area.
|
When the primer has dried, apply the surface enamel in the same way. Spray on several times and allow the paint to dry a minute or so between each application.
NOTE: Legislation in your area may prohibit the purchase or use of spray paint. Please check your local regulations.
|
Washing the car
The car should be washed at regular intervals since dirt, dust, insects and tar spots adhere to the paint and may cause damage.
When washing the car, do not expose it to direct sunlight. Use lukewarm water to soften the dirt before you wash with a sponge, and plenty of water, to avoid scratching.
A detergent can be used to facilitate the softening of dirt and oil. A water-soluble grease solvent may be used in cases of sticky dirt. However, use a washplace equipped with a drainage separator. Dry the car with a clean chamois and remember to clean the drain holes in the doors and rocker panels.
The power radio antenna must be dried after washing.
Tar spots can be removed with kerosene or tar remover after the car bas been washed.
A stiff-bristle brush and lukewarm soapy water can be used to clean the wiper blades. Frequent cleaning improves visibility considerably.
NOTE:
During high pressure washing the spray mouth piece must never be closer to the vehicle than 13" (30 cm). Do not spray into the locks.
It is particularly important to wash the car frequently in the wintertime to prevent corrosion, when salt has been used on the roads.
Bumpers
: Wash the bumpers with the same cleaning agent used on the rest of the car. Never clean the bumpers with gasoline or paint thinner. Difficult spots can be removed with denatured alcohol. To avoid scratches, do not dry the bumpers with paper.
|
Also wash off the dirt from the underside (wheel housings fenders, etc..) In areas of high industrial fallout more frequent washing is also recommended.
Suitable detergents
Special car washing detergents or liquid dishwashing detergent can be used. A suitable mixture is about 2.5 fl. oz. (8.5 cl.) of detergent to 2.6 US gal. (10 liters) of warm water. After washing with a detergent the car should be well rinsed with clean water.
Bird droppings
Remove from paintwork as soon as possible. Otherwise the finish may be permanently damaged.
WARNING!
When the car is driven immediately after being washed, apply the brake several times in order to remove any moisture from the brake linings.
Engine cleaning agents should not be used when the engine is warm. This constitutes a fire risk.
|

NOTE:
When washing the car, remember to remove dirt from the drain holes in the doors and sills.
|
pg. 7:7
Automatic car washing, Polishing and waxing, Chromed parts
|
Automatic washing - simple and quick
An automatic wash is a simple and quick way to clean your car. Keeping the underbody clean is most important, especially in the winter. Some automatic washers do not have the facilities for washing the underbody. Before driving into an automatic wash, make sure that the side view mirrors, auxiliary lamps, etc., are secure, otherwise there is risk of the machine dislodging them. You should also lower the antenna. We recommended that you do not wash your car in an automatic wash during the first six months (because the paint will not have hardened sufficiently).
Polishing and waxing
Normally, polishing is not required during the first year after delivery, however, waxing may be beneficial.
Before applying polish or wax the car must be washed and dried. Tar spots can be removed with kerosene or tar remover. Difficult spots may require a fine rubbing compound.
After polishing use liquid or paste wax.
Several commercially-available products contain both polish and wax. Waxing alone does not substitute for polishing of a dull surface.
A wide range of polymer-based car waxes can be purchased today.
The waxes are easy to use and produce a long-lasting, high-gloss finish that protects the bodywork against oxidation, road dirt and fading.
Chromed parts
Chromium-plated and anodized parts should be washed with clean water as soon as they become dirty. This is particularly important if you drive on gravel roads or on roads where salt is used during the winter. After the car has been washed, apply wax or an anti-rust preparation.
Stains on chrome trim can be removed with commercially-available chrome cleaner. Do not use abrasive compounds or steel wool.
Cleaning the upholstery
The
fabric
can be cleaned with soapy water or a detergent. For more difficult spots caused by oil, ice cream, shoe polish, grease, etc.., use a clothing/clothing fabric stain remover.
The
plastic
in the upholstery can be washed with soapy water or a mild detergent.
Leather
upholstery can be cleaned with a soft cloth and mild soap solution.
For more difficult spots, consult your Volvo dealer.
On no account must gasoline, naphtha or similar cleaning agents be used on the plastic or the leather since these can cause damage.
Cleaning the seat belts
Clean only with lukewarm water and mild soap solution.
Cleaning floor mats
The floor mats should be vacuumed or brushed clean regularly, especially during the winter when they should be taken out for drying. Spots on textile mats can be removed with a mild detergent.
Bear in mind
Take extra care when removing stains such as ink or lipstick since the coloring can spread.
Use solvents sparingly. Too much solvent can damage the seat padding.
Start from the outside of the stain and work toward the center.


Contents | Top of Page


