| pg. 6:13 Fuses |
Fuses
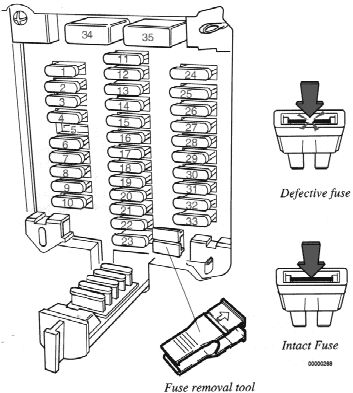
The easiest way to see if a fuse is blown is to remove it. Refer to the list of fuses on the inside of the fuse box cover to see which one should be examined.
Pull the fuse straight out. From the side, examine the curved metal wire to see if it is broken. If so, put in a new fuse of the same color and amperage (written on the fuse). Spare fuses are stored in a lit compartment in the fuse box:
1 x 15A (blue), 1 x 25A (pale yellow), 1 x 30A (green)
If fuses burn out repeatedly, have the electrical system tested at a Volvo dealer.
If you find it difficult to remove a fuse, you will find a special fuse tool clipped in the fuse box.

| pg. 6:14 Fuses |
Location*
Amperage
1 Position lights license plate light
10
2 Position lights
10
3 Left high beam
15
4 Right high beam
15
5 -
6 Left low beam
15
7 Right low beam
10
8 Front fog lights
15
9 Rear fog light
10
10 Instrument/panel lighting
5
11 Back-up lights, turn signals, cruise control
15
12 Shift lock
15
13 Heated rear window, heated side-view mirrors
25
14 Overdrive, seat belt reminder, relays for power windows/sunroof/heated seats, key reminder
10
15 -
16 Heated seats
30
17 -
18 Audio system
5
19 ECC, rear wiper/washer (wagons), cigarette lighter, power seats, ambient temperature sensor
15
20 Windshield wipers/washers, horn
25
21 Transmission mode selectors
5
22 ABS
15
23 Transmission control
10
24 Transmission/engine controls
10
25 Hazard warning flashers, central locking system
25
26 Clock, interior lighting, door open warning lights, glove compartment lights, reading lights, cargo space vanity mirrors
10
27 Brake lights, shiftlock
15
28 ECC, air conditioning
30
29 Power antenna, power to trailer
30
30 Fuel pump (tank), heated oxygen sensor
10
31 Engine control systems, fuel pump (main)
25
32 -
33 Audio system
10
34 Power windows, power sun roof
30
35 Power seats
30
Note: Refer to fuse box cover label for your vehicle's specific fuse usage.
Note: Fuses No. 34 and 35 are circuit breakers which activate when overloaded. After 20 seconds, the circuits should have cooled down and function normally.
For more detailed information concerning function and location of relays, fuses, etc., refer to the Volvo Service Manuals. These can be purchased directly using the Service Literature Brochure/Order Form or through your Volvo dealer.
* Some of the equipment/systems listed may be available on certain models only and/or as optional items only.
| pg. 6:15 Replacing wiper blades |
|
Replacing wiper blades
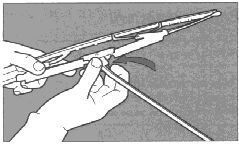
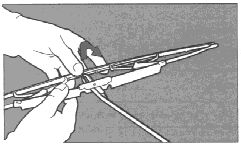
Lift the wiper arm off the windshield and hold blade at right angles to arm. Pinch the end of the plastic clip located at the back of the arm. Slide the wiper blade along the arm to release it from the hook. |
|
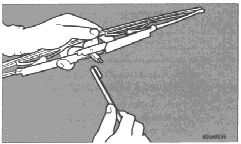
Install new blade (installation is the reverse of removal) and make sure that it is properly attached to the wiper arm.
For reasons of safety, you should change the windshield wiper blades as soon as they start to leave marks on the windshield or fail to wipe efficiently and cleanly. |
| To obtain maximum lifetime from a set of wiper blades, clean them with a stiff-bristle brush and warm, soapy water as part of a normal car wash. |
| pg. 6:16 Service diagnosis |
The diagnoses outlined below are intended to serve only as guides to locate and temporarily correct minor faults. Causes of unsatisfactory performance should be investigated and corrected by your Volvo dealer only. See section "Road Assistance".
| Starter fails to operate (or operates very slowly) |
Weak battery or dead cell.
With the starting (ignition) switch in the "Driving" or "On" position, check to see if the warning lights on the dashboard come on and if they stay on when the starter is engaged. If the lights do not come on or if they go off when the starter is engaged, the battery is discharged, or see below.
Loose or corroded battery cable terminals.
Check battery terminals and clamps. Clean or replace if necessary. Check that the starter cable is secure at its terminals.
The ground strap, which connects the body to the rear of the engine, should also be checked for corrosion or looseness.
Open circuit between starting (ignition) switch and starting (ignition) switch terminal on starter.
The circuit is closed if a clicking sound is heard from the starter when it is engaged. If no clicking sound is heard, check that the blue wire at the starter is secure. If still no clicking sound is heard, the starting (ignition) switch or the wire is defective.
Starter motor defective.
If the above checks have been performed, and no fault is evident, the starter may be defective.
NOTE: In this case the headlight intensity will not decrease when the starter is engaged.
| pg. 6:17 Service diagnosis (cont.) |
| Starter motor operated but engine does not start |
Intake system leaking.
Check vacuum hose connections at manifold and idle air control valve.
No fuel reaching engine.
Check for fuel in the tank.
Check fuses No. 30 and 31.
No spark.
If there is no spark, check that the high tension lead from the coil to the distributor cap is connected and that the wires to the distributor and coil are connected.
If no fault is found following the above steps, contact your Volvo dealer.
| Excessive fuel consumption |
Fuel lines leaking.
Check tightness.
Spark plugs worn.
Replace plugs.
| pg. 6:18 Service diagnosis (cont.) |
| Erratic idle (misfiring) |
Intake system leaking.
Check vacuum hose connections to manifold and idle air control valve.
Worn spark plugs.
Remove. Clean or replace spark plugs.
| Engine stops running at irregular intervals |
Defective wires.
Check wire terminals at: fuel pump, fuses, coil, ignition switch and relays.
Intake system leaking.
Check vacuum hose connections at manifold and idle air control valve.
Fuel filter clogged.
Clean fuel tank filter and replace line fuel filter.
| Misfiring at highway driving speed |
Spark plugs fouled.
Drive the vehicle in a lower gear and keep the engine rpm higher for a few miles in order to remove carbon deposit on the spark plugs. If this procedure is not effective, clean or replace the spark plugs.
Please be aware that misfiring spark plugs can cause damage to the three-way catalytic converter.
| pg. 6:19 Service diagnosis (cont.) |
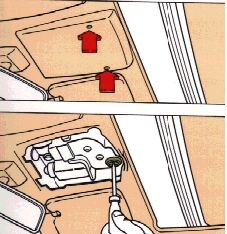
Emergency sun roof operation
If, because of an electrical fault (e.g. a blown fuse), it is not possible to operate the sun roof electrically, then it is possible to operate it manually.
First, using a small screwdriver, remove the two screws that secure the sun roof motor cover to the headliner. Then using a screwdriver, depress the white plastic clutch pin in the center of the motor screw to close or open the roof as desired.
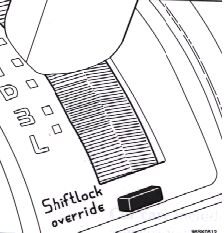
Shiftlock release
The gear selector is locked in the P position. To manually release the shift lock, turn the starting (ignition) key to position I and press firmly on the "SHIFTLOCK OVERRIDE" button located near the base of the gear selector (see illustration). While holding the override button down, move the gear selector from the (P)ark position.