
Automatic transmission oil
Capacity: See "Specifications" section
Fluid type: Automatic Transmission Fluid type Dexron IID or IIE.
Replace: Every 20,000 miles (32,000 km).
Warning!
|
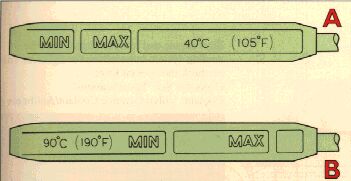
A Cold transmission: oil temperature + 105°F (+40°C).
This is a normal temperature for the transmission after idling for about 10 minutes.
At oil temperature below + 105°F (+40°C), the level may be below the MIN mark.
B Warm transmission: oil temperature + 190°F (+90°C).
This temperature is reached after driving for about 30 minutes.
At oil temperature ABOVE +190°f (+90°c), THE LEVEL MAY BE ABOVE THE max MARK.
NOTE:
|
Check the oil level as follows:
Park the car on level surface with the engine idling.
Slowly move the selector lever through all gear positions and then to position P. Wait 2 minutes before checking the oil level. As the illustration shows, the dipstick has a "Cold" and a "Warm" side. The oil level should be between the MIN and MAX marks.
Wipe the dipstick with a clean cloth.
Warning! The oil may be very hot |
Do not use rags that could leave lint on the dipstick.
The transmission is topped up via the dipstick tube.
The space between the MIN and MAX marks on the dipstick corresponds to 0.5 US qt (0.5 liter). Do not fill the transmission with too much oil, since this can result in oil being ejected from the transmission.
Too little oil, on the other hand, can negatively affect transmission operation, particularly in very cold weather.
If you change the coolant yourself, your Volvo dealer can also assist you in disposing of the used coolant.
Check coolant level
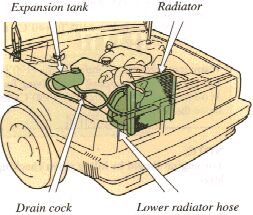
The cooling system must be filled with coolant and not leak to operate at maximum efficiency. Check the coolant level regularly. The level should be between the "Max" and "Min" marks on the expansion tank. The check should be made with particular thoroughness when the engine is new or when the cooling system has been drained.
Do not remove the filler cap other than for topping-up with coolant. Frequent removal may prevent coolant circulations between the engine tank during engine warm-up and cooling.
Changing coolant
Normally, the coolant does not need to be changed. If the system must be drained, use the following procedure:
Remove the expansion tank cap. Open the drain cock on the right side of the engine block and disconnect the lower radiator hose.
Fill coolant through the expansion tank. The heater controls should be fully open when draining and filling.
Add coolant until the level is up to the MAX mark or slightly above.
Start the engine and run until hot. Check the cooling system connections for tightness. Also re-check the coolant level.
Capacity: See "Specifications"
coolant: Volvo Genuine Coolant/Antifreeze only
CAUTION!
|
WARNING: If the engine is warm and you are going to top up coolant, unscrew the cap slowly in order to allow any excess pressure to escape. |
NOTE: Do not top up with water only. Water by itself reduces the rust-protective and anti-freeze qualities of the coolant and has a lower boiling point. It can also cause damage to the cooling system if it should freeze.
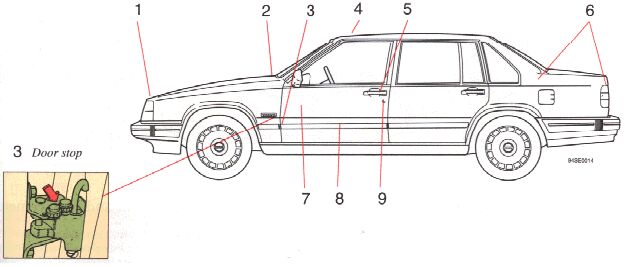
No. Lubricating hint
Lubricant
1 Hood lock and latch
Oil
2 Hood hinges
Oil
3 Door stop and hinges
Oil
4 Sun roof wind deflector
Oil
Sun roof mechanism
Grease
5 Door lock catch plate
Oil
6 Trunk lid lock
Low temperature
keyhole and hinges
grease
7 Window regulator
Oil, grease
locking device
low temperature
(on inside of door)
grease
8 Front seat slide rail
and latch
Oil
9 Door lock keyhole
Low temperature grease or Volvo Teflon lock spray
To avoid rattles and unnecessary wear, the body should be lubricated a few times per year.
Checking the belt tension
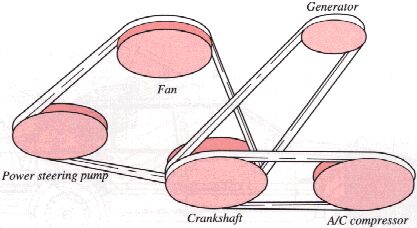
The belt tension can be checked by depressing the fan belt (engine not running!) at a point midway between the generator and fan. It should be possible to press down the belt about 1/4" - 3/8" (5-10 mm). This also applies to other drive belts on the engine.
WARNING! The engine must not be running when this check is performed. |
Belt check
Check the belt regularly to make sure it is in good condition and is clean. Worn or dirty belts can cause poor cooling and low generator output as well as impair the operation of the power steering and the air conditioning unit.
Belt adjustment and replacement
The belts can be difficult to reach and it is advisable to let your Volvo dealer adjust the tension of the belts or replace them, if necessary.
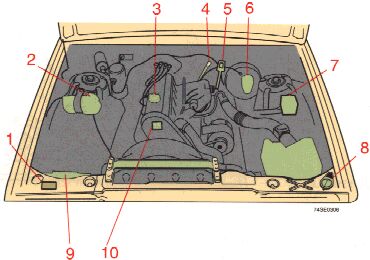
940 B 230 FD
1 Data plate
2 Expansion tank, coolant
3 Oil filler cap, engine
4 Oil dipstick, engine
5 Oil dipstick, automatic transmission
6 Brake fluid reservoir
7 Oil reservoir, power steering
8 Washer fluid reservoir
9 Battery
10 Engine identification label
WARNING!
|
pg. 8:18 Engine compartment |
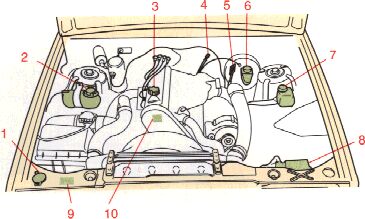
940
(With optional B 230 F Turbo engine)
1 Washer fluid reservoir
2 Expansion tank, coolant
3 Oil filler cap, engine
4 Oil dipstick, engine
5 Oil dipstick, automatic transmission
6 Brake fluid reservoir
7 Oil reservoir, power steering
8 Battery
9 Data plate
10 Engine identification label
WARNING!
|