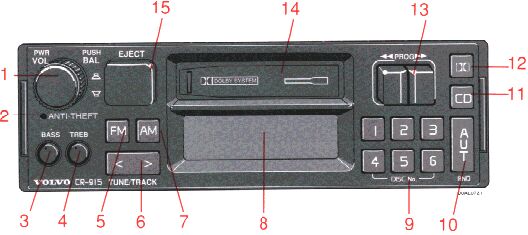
The following pages describe the use of your CR-915 Cassette radio and CD remote control

1.
Anti-theft code
The radio features anti-theft circuitry. If the set is removed from the vehicle or if the battery power is disconnected, a special code must be entered to enable radio operation of the set.
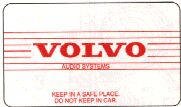
Refer to the radio code card supplied with your vehicle or ask your dealer for the correct code.
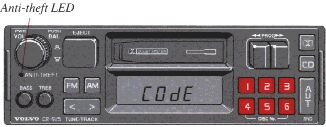
When the car is parked with ignition key removed the anti-theft LED will flash.
To enter the code
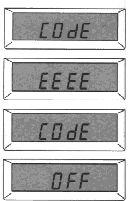
After installation or when the set has been disconnected from power, the set displays "COdE" when it is switched on.
Enter the 4-digit code using the preset buttons.
If the correct code is entered the set is ready to use.
If you enter an incorrect code you must enter the correct again from the beginning.
Incorrect code
If an incorrect code has been entered "EEEE" is displayed. Enter the correct code.
After three unsuccessful coding attempts the set will lock and remain locked for two hours. "OFF" is displayed.
During this waiting period:
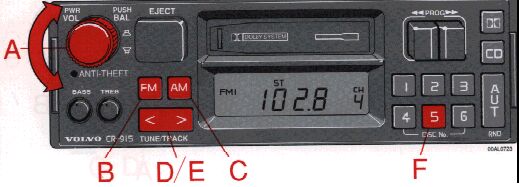
A - On/off switch and volume control
Turn the button clockwise to switch on and to increase the volume.
B - Waveband selector FM
Press button FM. The set is then displayed: FM1 or FM2.
C - Waveband selector AM
D - Manual tuning
E - Seek tuning
The "SEEK" function can be used on both sides of the tuning button. If the button is pressed for more than 1 second, the radio automatically seeks the next audible station and stops there. If you want to continue seeking, press the tuning button once more for more than 1 second.
F - Setting frequency selection
The radio can be used in most parts of the world by changing the frequency selection intervals as follows:
Depress and hold preset button 5 and turn the radio ON. "USA" will flash on the display. Each time button 5 is pressed, the frequency selection will change from "USA" to "AUS", etc. When the correct country name is displayed, wait 5 seconds and the radio will be ready for use.
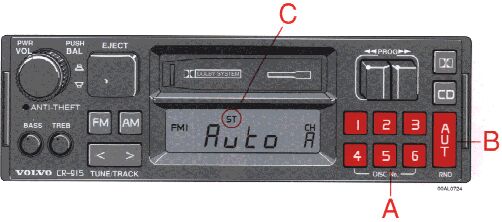
A - Presetting
1. Tune to the desired frequency.
2. Press a preset button. The second cuts out.
3. Keep the button pressed until the sound comes on again (after approx. 2 seconds).
4. The frequency is now stored and can be obtained by pressing the preset button. The chosen preset number is displayed.
B - Automatic programming (Auto store)
This feature works on all wavebands!
1. Press the "AUT" button until "Auto a " is displayed. A maximum of the eight strongest stations on the chosen waveband are now automatically stored in the memory. If there are no audible stations, "----" is displayed.
2. Press the "AUT" button once again for less than 1 second if you wish to listen to another autostored station. A new station is set each time "AUT" is pressed.
C - Stereo Indicator
When receiving a stereo transmission "ST" will be displayed.
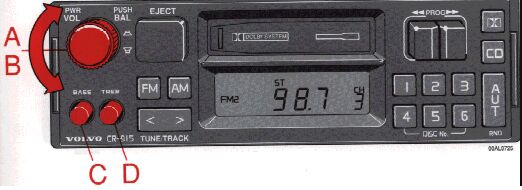
A - Balance control
Push the knob and turn clockwise/anticlockwise to adjust right/left speaker balance.
B - Fader control
Pull out the knob and turn clockwise/anticlockwise to adjust front/rear speaker balance. After adjustment push the knob back to its previous position.
C - Bass control
Press the knob. The knob is springloaded. Turn clockwise/anti-clockwise to adjust the bass. After adjustment, push the knob back again into its previous position.
D - Treble control
Press the knob. The knob is springloaded. Turn clockwise/anti-clockwise to adjust the treble. After adjustment, push the knob back again into its previous position.
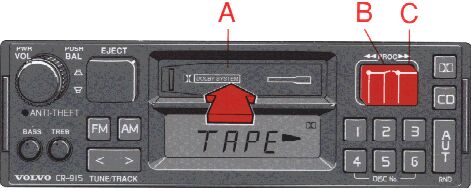
A - Cassette slot
The cassette is inserted with the open side to the right (side 1 or A of the cassette upwards). When the cassette is inserted, the radio is disengaged and the cassette will start to play automatically. "TAPE
 " or "TAPE
 " is displayed to indicate which side of the tape is being played. When one side of the tape is being played. When one side of the tape has been played the unit will automatically play the other side (auto-reverse). The cassette can be inserted or ejected even when the unit is switched off.
B - Reversing the tape (rev)
Press both "PROG" buttons to reverse direction of the tape (to play the other side of the tape). The tape direction is displayed.
C - Fast winding
Press either button to wind the tape. If the button you press is fully pressed, fast winding will go on to the end of the tape. The other side of the tape will then be played.
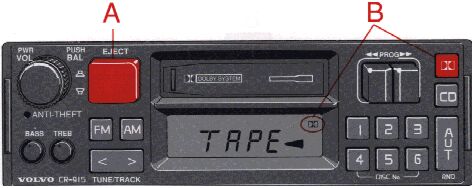
A - Cassette eject
Press the button to stop the tape and to eject the cassette. The radio will then automatically re-engage, and the latest station listened to will be received.
B - Dolby - noise reduction system
This set has DOLBY B noise reduction system for tape playback. The Dolby function is engaged when the Dolby symbol is shown in the display. Press the Dolby button when you want to engage/disengage the Dolby function.