| pg. 6:3 Wheel changing |


|
NOTE:
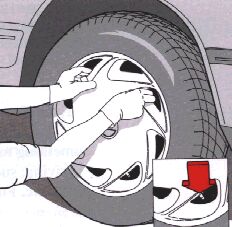
To avoid excessive wear and the necessity of rebalancing, mark and reinstall wheels in same location and position as before removal. To lessen the chance of imbalance, each wheel hub is equipped with a guide stud to ensure that a removed wheel can be reinstalled in its original position (as when changing over to winter tires/wheels). When reinstalling the wheel cap, allow a gap of approximately 1/5" (5 mm) between the cap and the rim to help prevent imbalance. |
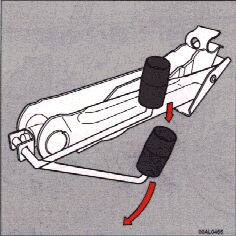
| NOTE: The crank handle on the jack can be forlded out by pressing the nob on the handle downward (see illustration above). To attach the jack, refer to the illustration on the following page. |
| pg. 6:4 Wheel changing (cont.) |

Jack attachment

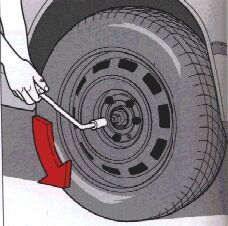
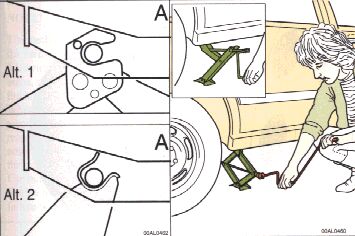
There is a jack attachment adjacent to each wheel location. Hang the jack from the attachment (alt. 1) or position the jack on the bar in the jack attachment (alt. 2) as shown in the illustration above and crank while simultaneously guiding the base to the ground. The base of the jack must be flat on a level, firm, non-slippery surface. Before raising the car check that the jack is still correctly positioned in the attachment . Now raise the vehicle until the wheel is free of the ground. Unscrew the wheel nuts completely and carefully remove the wheel so as not to damage the tread of the studs.
|
WARNING!
|
Installing the wheel
Clean the contact surfaces on the wheel and hub. Lift the wheel and place it on the hub. Make sure that you align the wheel with the guide stud on the wheel hub prior to installation. Install the wheel nuts crosswise and tighten lightly. The bevelled side of the nuts should face the wheel. Lower the vehicle to the ground and alternately tighten the nuts to 63 lbs. (85 Nm). Install the wheel cap.
Some models have a hub cap that extends to the wheel rim. The valve symbol on the inside of the hub cap should be installed toward the valve. After driving for a short time, a gap of approximately 0.2" (5 mm) will develop between the wheel cover and the rim. This is normal.