Replacing fuses
If an electrical component fails to function, it is likely that a fuse has blown due to a temporary circuit overload.
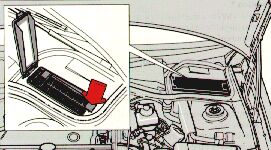
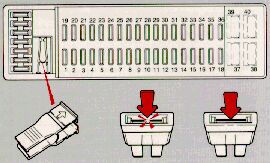
The fuse box is located in the engine compartment (see illustration) and can be opened by lifting the cover.
A label on the inside of the cover indicates the amperage and the electrical components that are connected to each fuse.
The easiest way to see if a fuse is blown is to remove it. Pull the fuse straight out. From the side, examine the curved metal wire to see if it is broken. If so, put in a new fuse of the same color and amperage (written on the fuse). Spare fuses are stored in a compartment in the fuse box.
If fuses burn out repeatedly, have the electrical system tested at a Volvo retailer.
If you find it difficult to remove a fuse, you will find a special fuse tool clipped in the fuse box.
pg. 6:14 Fuses |
Location * Amperage
1 Fuel injection, distributor ignition system, automatic gearbox
15A
2 Fuel pump
15A
3 Interior courtesy lights
10A
4 ñ
5 ECC blower (speed 4)
30A
6 Central locking system
25A
7 Audio system
15A
8 ñ
9 ABS
30A
10 Electrically heated rear seat
15A
11 Electrically heated rear window and side-door mirrors
30A
12 Brake lights
10A
13 Hazard warning flashers, headlight flashers
15A
14 ABS
30A
15 OBD socket, courtesy lights, open door warning lights,
remote operated central locking system
10A
16 Power antenna, electrical connector for trailer, accessories
30A
17 Key reminder, seat belt reminder
10A
18 Front fog lights
15A
19 Left high beam
15A
20 Right high beam, high beam indicator light
15A
21 Left low beam
15A
22 Right low beam
15A
23 Left parking lights, license plate lights
10A
24 Right parking lights
10A
25 Rear fog light, rear fog light indicator light
10A
26 Heated front/rear seats, power side-view mirrors
25A
27 Backup lights, direction indicators
15A
28 Cruise control, heated rear windows, seat belt reminder light,
bulb failure warning sensor, shiftlock
10A
29 ABS
15A
30 Cigarette lighter
10A
31 ECC blower (speeds 1-3), ECC, AC-compressor
25A
32 Audio system, remote controlled central locking
10A
33 Rear window wiper/washer (wagons) 15A
* Some of the equipment/systems listed may be available on certain models only.
** This is an automatic circuit breaker located in the fuse box and does not normally need to be replaced.
For more detailed information concerning function and location of relays, fuses, etc., refer to the Volvo Service Manuals. These can be purchased directly using the Service Literature Brochure/Order Form or through your Volvo retailer.
Installation of accessories
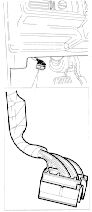
In order to help avoid interference and damage to your car's electrical system, your car is equipped with an accessory connector located under the instrument panel on the driver's side.
Please consult your Volvo retailer if you have any questions before connecting accessory or optional equipment to the vehicle's electrical system.
Connector (for accessories)
| Position | Connection | Max. load |
| 1 | Battery + (30) | 20 A |
| 2 | X Supply | 0,5 A |
| 3 | High beam | 1 A |
| 4 | Low beam | 1 A |
| 5 | Pos Light | 1 A |
| 6 | Rheostat | 0,5 A |
| 7 | Front acc. conn. | 2 A |
| 8 | Earth (31) | ñ |
|
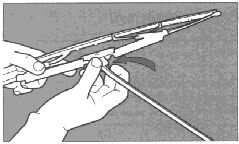
| Replacing wiper blades Lift the wiper arm off the windshield and hold blade at right angles to arm. Pinch the end of the plastic clip located at the back of the arm. Slide the wiper blade along the arm to release it from the hook. |
|
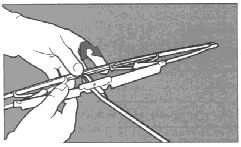
| Install new blade (installation is the reverse of removal) and make sure that it is properly attached to the wiper arm. For reasons of safety, you should change the windshield wiper blades as soon as they start to leave marks on the windshield or fail to wipe efficiently and cleanly. |
|
| To obtain maximum lifetime from a set of wiper blades, clean them with a stiff-bristle brush and warm, soapy water as part of a normal car wash. |
pg. 6:17 Replacing headlight wiper blades |

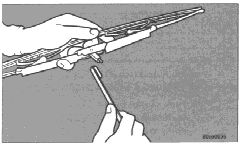
Replacing headlight wiper blades (certain models)
Pull the wiper blade in the direction indicated by the arrow in illustration to remove it. Press the new blade into place. Check that the new blade is properly attached to the wiper arm.
Cleaning the outside of the wiper blades
If the windshield/tailgate is not clear after using the wiper(s) or if the blade chatters when running, wax or other material may be on the blade or on the surface of the glass.
Clean the glass with a suitable cleaning agent. The glass is clean if beads do not form when you rinse it with water.
Clean the wiper blade by wiping vigorously with a cloth soaked in full strength windshield washer solvent. Then rinse the blade with water.
Clean the wiper blade by wiping vigorously with a cloth soaked in full strength windshield washer solvent. Then rinse the blade with water. Wiper blades should be checked on a regular basis and replaced when worn.
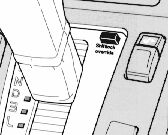
Shiftlock release (automatic transmission only)
The gear selector is locked in the (P)ark position. To manually release the shiftlock:
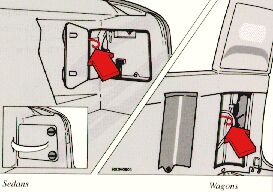
Fuel tank cover does not open
Faulty motor in fuel tank cover
(Sedans):
Open the cover panel on the right tail light unit and pull on the hook.
The fuel tank cover can then be opened.
(Wagons):
Remove the right floor cover (the center storage compartment must be opened first) and the cover panel on the right lower tail light. Pull on the hook and the fuel tank cover can then be opened.