
1 Height adjustment (manual)
The front section of both front seats can be adjusted to eight different height settings and the rear section of both seats can be adjusted to nine different height settings.
Lever forward
= adjustment of front section
Lever rearward
= adjustment of rear section
WARNING! Do not adjust the seat while driving. The seat should be adjusted so that the brake pedal can be depressed fully. In addition, position the seat as far rearward as comfort and control allow. The seat rails on the floor must not be obstructed in any way when the seat is moved. |
2 Forward-rearward seat adjustment (manual)
Pull the control upward, then slide the seat forward or rearward to the desired position. Make sure that the seat is properly secured when you release the control.
Folding front seat
The passenger's seat backrest has a quick forward release mechanism which can be used when long loads are carried. See page 2:22.
3 Backrest angle (manual)
Rotate the control mechanism counterclockwise to tilt the backrest rearward and clockwise to tilt the backrest forward.
4 Lumbar support*
Firm: turn clockwise.
Soft: turn counter-clockwise.
*Driver's seat only on certain models
Electrically operated seats with memory function (certain models)
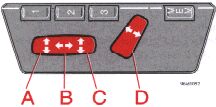
A Seat front (raise/lower)
B Forward - rearward
C Seat rear (raise/lower)
D Backrest tilt
WARNING! The driver's seat is operable with the ignition OFF. Therefore, children should never be left unattended in the car. |
Movement of the seat can be STOPPED at any time by pressing any button on the power seat control panel.
Refer to the following page for information on programming the memory function.
pg. 2:7 Electrically operated driver's seat, Rear/side-view mirrors |
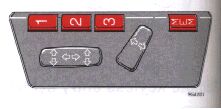
Programming the memory
Three seat positions can be programmed. To program a seat position:
1. Adjust the seat to the desired position.
2. Depress the MEM button.
3. Press button 1 to program the current position of the seat.
Buttons 2 and 3 can be programmed in the same way for two additional seat positions. To move the seat to a programmed position, depress button 1, 2 or 3 until the seat stops. If the button is released before the seat has the reached the programmed position, it will stop as a safety precaution.
NOTE: The seat have an overload protector which engages if an object blocks the movement of the seat. If this happens remove the object and wait 20 seconds before operating the seat again.
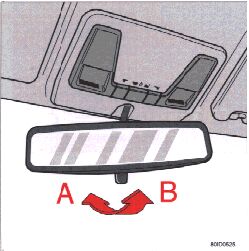
Rear-view mirror
A
Normal position
B
Night position, reduces glare from following headlights
CAUTION: Never use ice scrapers made of metal as they can easily scratch the mirror surface. |
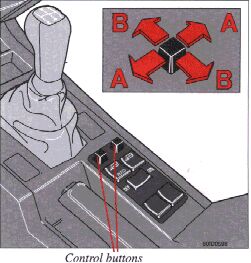
Electrically operated side-view mirrors
The control switches are located in the central console, beside the parking brake.
A
Lateral adjustment
B
Vertical adjustment
WARNING! The mirrors should always be adjusted prior to driving. Objects seen in the wide-angle right side-view mirror are closer than they appear to be. |
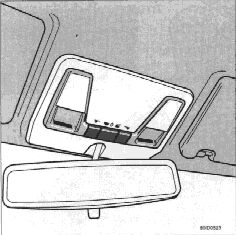
Front courtesy lights
The front courtesy lighting consists of two reading lights for the front seat occupants.
 Front and rear reading lights always on
 Front and rear reading lights always off
 Front and rear reading lights come on when a door is opened
 Left or right reading light illuminates if the center switch is in position
.
Left or right reading light illuminates if the center switch is in position
.

Reading lights, rear seat
There are two reading lights for the rear seat passengers. These are turned on/off by using the adjacent switches.
Light is on if the front switch is in position
.
Light turns on if any door is opened.
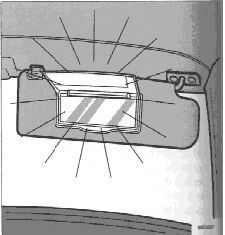
Vanity mirrors
The light illuminates when the cover is opened.
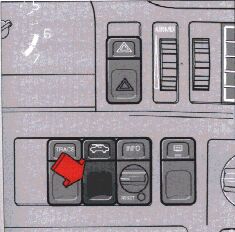
Electrically-operated sun roof
The switch for operating the sun roof is located on the instrument panel. The starting (ignition) key must first be turned to the drive position. On certain models, the sun roof is equipped with a one-touch, AUTO-open function.
* A position where the sun roof is not quite fully open. This position helps alleviate "rumbling" wind noise.
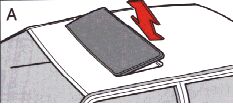
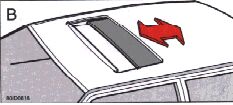
Sun visor: The sun roof also features a sliding sun visor. The visor slides back automatically when the sun roof is opened and also slides back slightly when the sun roof is opened to the ventilation position. The visor must be closed manually.
CAUTION: Do not close the sun visor when the sun roof is in the ventilation position as this could damage the mechanism. |
NOTE:
The electrically-operated sun roof has an overload protecting circuit breaker which is activated when an object blocks the sun roof. Should this occur, remove the object and wait 20 seconds for the circuit breaker to reset. The sun roof should then function normally. Also check fuse no. 35.
WARNING! The sun roof must never be obstructed in any way when in operation. |
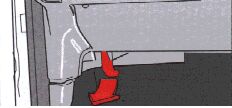
To open the hood
Pull the lever located under the left side of the dash to release both hood catches. This also releases and exposes the safety handle in the front of the grille.
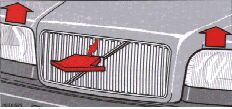
Do not lift the hood using the safety handle.
WARNING! Check that the hood locks properly when closed. |
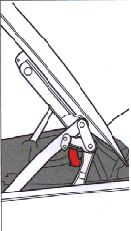

The hood normally opens to an angle of approximately 57°. The hood can be opened to the vertical position by rotating the hinge catches (see illustrations). The catches will return to their normal positions when the hood is closed. Ensure adequate clearance in low-roof garages to avoid damaging the hood.
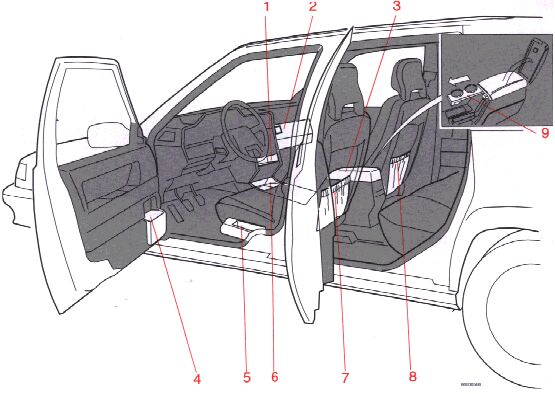
1 Compartment in center console (certain models)
2 Glove compartment
3 Compartment in armrest (certain models)
4 Compartment in door
5 Compartment beside front seat (certain models)
6 Compartment between front seats
7 Pocket on rear of front seat
8 Pocket on rear of front seat
9 Mugholder (certain models)
WARNING! Packages on the rear window shelf can obscure vision and may become dangerous projectiles in the event of a sudden stop or an accident. |