Replacing bulbs
The method for replacement of bulbs in the various lighting units is shown on the following pages. Make sure when installing bulbs, that the guide pin on the socket fits into its corresponding recess.
When installing Halogen bulbs, do not touch the glass with your fingers because grease, oil or any other impurities can be carbonized onto the bulb and damage the reflector.
Use bulbs of correct type and voltage. Failure to do so could cause the bulb failure warning light to activate.
NOTE: Turn the ignition and the light switch off before replacing any bulbs. |

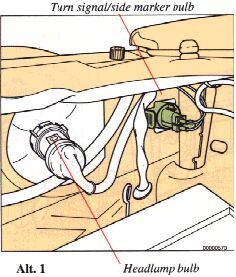
Headlamps
1 Pull the connector out.
2 Loosen the ring by turning it counterclockwise.
3 Pull the bulb straight out.
4 Replace the bulb and reinstall the unit in the reverse order.
Bulb
Power
US Bulb No.
________________________
Headlamp
(45/65)
HB1/9004
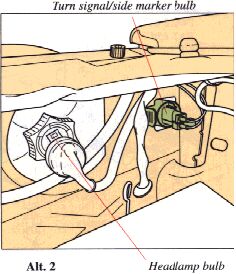
Turn signal/parking light/side marker bulb
1 To remove, turn the lamp holder 1/4 turn counter-clockwise.
2 Press the bulb in and turn it 1/4 turn counter-clockwise.
3 Replace the bulb and reinstall the unit in the reverse order.
Power CP (W)
Socket
US Bulb No.
______________________________
24/2.2 (21/5)
BAY 15d
1157 NA
pg. 6:6 Replacing bulbs (cont.) |
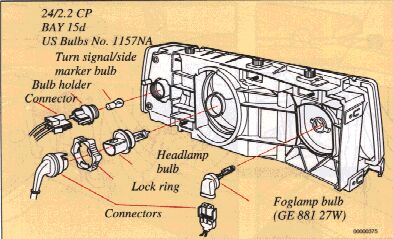
Models with front fog lamps
Access to the bulbs is obtained from the engine compartment. Switch off the lights and ignition key.
Fog lamps
1 Turn the lamp holder 1/4 counter-clockwise.
2 Remove the bulb from the connector by pushing the catches to the sides.
3 Replace the bulb and the holder.
Note : Reinstall the unit carefully to avoid changing the direction of the beam. |
Bulb
Power
US Bulb No.
_______________________
Foglamp
(27 W)
GE881
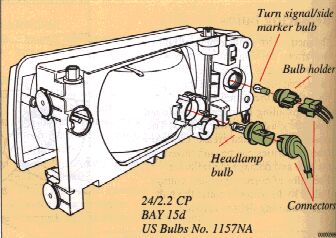
Models without front fog lamps
Note : It may be necessary to remove the washer fluid reservoir fill tube in order to gain access to the bulb holder. |
pg. 6:7 Replacing bulbs, Sedans |
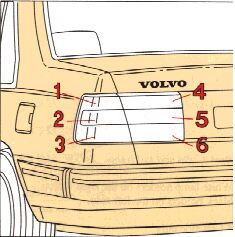
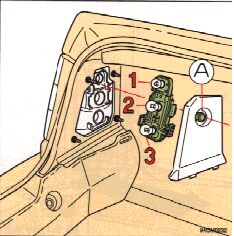
Replacing tail lights bulbs (sedan models)
All tail lamp bulbs are replaced from inside of trunk. To avoid confusion, replace the bulbs one at a time.
1 Unscrew and remove tail lamp inside cover. Note that inside cover is hooked at the lower edge.
2 Remove plastic screw A and remove bulb holder and bulb (one unit).
3 Depress bulb in bulb holder, turn it slightly counterclockwise, and remove it.
4 Install a new bulb. Install bulb holder in tail lamp.
5 Check that bulb lights. Replace tail lamp inside cover.


Bulbs
Power
Socket
US Bulb No
CP(W)
1,4 Tail light
4 (5)
BAA 15s
67
2 Rear turn signal
32 (21)
BA 15s
1156
3 Brake light
32 (21)
BA 15s
1156
5 Back-up light
32 (21)
BA 15s
1156
6 Rear foglight*
32 (21)
BA 15s
1156
* One light only, on left side
pg. 6:8 Replacing bulbs, Wagons |
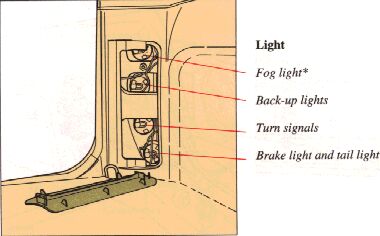
All tail light bulbs are replaced from inside the vehicle
Light Wattage Socket
Fog light
*
21W 32CP
BA15s
Back-up lights
21W 32CP
BA15s
Turn signals
21W 32CP
BA15s
Brake light and tail light
21/5W 32/3CP
BAY15d
White lamp holders on the right side, black holders on the left side.
* Left side only
Replacing tail light bulbs (wagon models)
To avoid confusion, replace the bulbs one at a time.
pg. 6:9 Replacing bulbs |
WARNING!
|
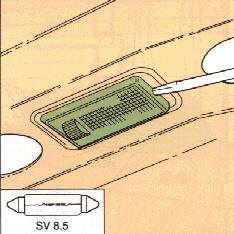
Trunk light
(sedan models)
Depress the catch with a screwdriver and remove the light assembly. Lift it out remove.
Replace the bulb.
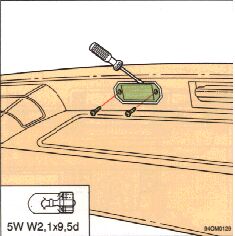
License plate light
(sedan models)
Remove the screws with a screwdriver. Insert a screwdriver and pry off the light assembly.
Replace the bulb and re-install light housing.
Bulb
Power
Socket
Bulbs
Power
Socket
Trunk light
10W
SV8.5
License plate light
5W
W2,1x9,5d
pg. 6:10 Replacing bulbs (cont.) |
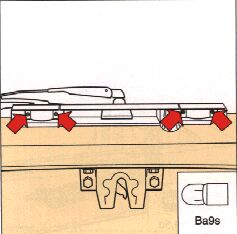
License plate light
(wagon models)
Remove the screws with a screwdriver.
Remove lamp housing. Depress the bulb and rotate it counter-clockwise. Remove the bulb.
Install a new bulb and re-install light housing.
Bulb
Power
Socket
License plate light
4W
Ba 9s
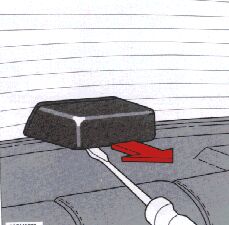
Depress catch with screwdriver
High-level brake lights
To remove:
Turn off ignition. Depress catch with a screwdriver.
Grasp the cover with both hands and pull it towards you.
Bulb
Power
Socket
High level brake light
21W 32cp
Ba 15s
(Us bulb no. 1156)
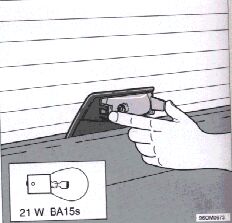
Depress catches and fit new bulb.
To fit:
Fit the reflector and check that the light works.
Sedan models
Press the cover into position, noting the position of the alignment pin at the top.
Wagon models
Align the catches and press the cover into position.
pg. 6:11 Replacing bulbs (cont.) |
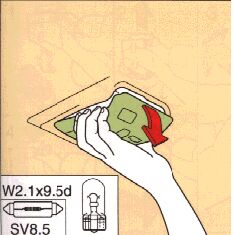
Interior light and reading lights
Take hold of the front section of the light as shown and pull straight down.
Replace the blown bulb and check operation before reinstalling the bulb housing.
Bulb
Power
Socket
Interior light
10W
SV8.5
Reading light
5W
W2.1x9.5d
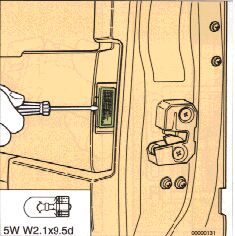
Door Warning lamps
All doors are equipped with red warning lamps. To replace a bulb, insert a screwdriver as shown in picture and gently turn it to remove the lens. Withdraw the bulb, replace it and re-insert the lens
Bulb
Power
Socket
Door warning lamp
3W
W2.1x9.5d
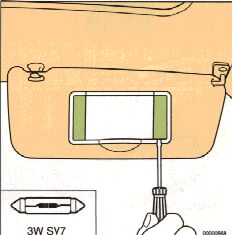
Vanity mirror
Insert a screwdriver and turn it to remove the lens. Replace the bulb and press the lens back into place.